


Photography is an art that offers countless creative possibilities. It becomes particularly exciting when you experiment with self-timers and remote triggers. These techniques open up new horizons for impressive images, whether in nature, in the studio, or when creating self-portraits. In this article, you’ll discover how to take extraordinary photos with simple means.
Key Insights
- Self-timers and remote triggers allow for creative freedom in photography.
- Long exposures capture impressive night and light effects.
- Smoke and light painting create dramatic effects in images.
- Macro photography highlights small details in an impressive way.
- Post-production techniques give photos the final touch.
Creative Self-Portrait Ideas with Self-Timers and Remote Triggers
The Right Equipment for Self-Portraits
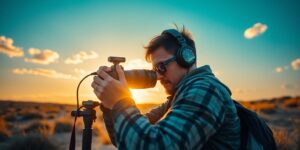
If you want to get started with self-portraits, you’ll need a few basic things. A tripod is your best friend. It keeps the camera stable while you prepare your perfect shot. Most cameras have a self-timer, but if you want real convenience, get a remote trigger. This allows you to control the camera from a distance without having to run back and forth. Modern cameras often offer apps that let you control the camera via your smartphone.
Tips for Composition and Lighting
Now that the technology is set, it’s time to get down to business: composition. The art of a great self-portrait lies in the right composition and lighting. Think in advance about the story you want to tell. Use natural light sources like window light for soft shadows or try artificial lighting to create dramatic effects. Make sure the background isn’t too busy so you remain the focus.
Experimenting with Different Poses
It never gets boring when you experiment with your poses. Try different angles and perspectives. Put yourself in the spotlight by playing with accessories or outfits. Move around the room until you find the pose that suits you best. Sometimes it helps to try out in front of the mirror to get a feel for what looks good. Let your creativity run wild – after all, you’re the star in your own picture!
Self-portraits are a great way to express yourself and discover new sides of yourself. Be bold and try things you might not otherwise dare. There are no rules except those you set for yourself. A 3-step guide can help you approach the task with more ease and confidence. Have fun experimenting!
Long Exposure: Capturing Magical Moments with Remote Triggers
The Basics of Long Exposure
Long exposure is a fantastic technique to make the invisible visible. With longer exposure times, you can capture movements that the human eye normally doesn’t perceive. Imagine capturing the path of stars or the light trails of cars. A stable tripod is your best friend to avoid blurring. Don’t forget the remote trigger, as it ensures you don’t have to touch the camera and thus avoid blurring.
Creative Ideas for Long Exposures
There are countless ways to experiment with long exposure:
- Light trails: Find a busy street and let the headlights of cars become dynamic lines.
- Stars: In the countryside, away from light pollution, you can capture the night sky in all its glory.
- Light painting: Grab a flashlight and paint in the air. With a little patience, artistic effects can be created.
- Water: Let waterfalls or ocean waves appear like a soft veil.
- Clouds: Watch how clouds turn into gentle streaks in daylight.
Avoiding Mistakes in Long Exposures
There are pitfalls with this technique as well. Here are a few tips to avoid common mistakes:
- Use a tripod: Even the slightest movement can ruin your image.
- Use ND filters: In daylight, a neutral density filter helps block too much light.
- Be patient: Sometimes it takes several attempts to get the perfect shot.
Long exposure requires practice and patience, but the results are worth it. Don’t be discouraged if it doesn’t work right away. With each photo, you learn more and discover new creative possibilities.
Dramatic Effects with Self-Timers and Remote Triggers

Smoke Bombs and Sparkler Trails
Imagine standing in the middle of a colorful smoke cloud gently drifting through the air. Smoke bombs are perfect for creating mystical and dramatic effects in your photos. The trick is to skillfully place the smoke and capture the perfect moment with the remote trigger. Sparkler trails are another hit! They give your images a magical touch. Simply hold the sparkler in your hand and draw patterns in the air with slow movements.
Light Painting and Laser Light Effects
Light painting is like magic with the camera. You only need a flashlight or an LED light and a dark room. With the remote trigger, you can keep the camera stable while you draw with the light. Laser light effects are also exciting. They create futuristic patterns and give your photos a touch of science fiction.
Creatively Using Silhouettes and Shadows
With backlighting, you can create impressive silhouettes. Position yourself between the light source and the camera to create clear outlines. Play with the shadows to develop interesting patterns and shapes. This technique is particularly suitable for creating dramatic and atmospheric images.
Sometimes it’s the simplest tricks that have the biggest effect. With a little creativity and a willingness to experiment, you can create true works of art with your remote trigger. Let your imagination run wild and have fun!
Macro Photography: Making Small Details Big
The Right Equipment for Macro Shots
In macro photography, the choice of equipment is crucial. A good macro lens is a must to capture tiny details up close. A tripod helps you keep the camera stable, especially when working with long exposure times. And don’t forget the lighting! A ring light or flash can reduce shadows and evenly illuminate your subject.
Creative Ideas for Macro Photography
Macro photography opens up a world of possibilities. You can capture the structure of flower petals, the patterns on insect wings, or even the texture of everyday objects. Experiment with different perspectives and distances to create unique compositions. Here are a few ideas:
- Photograph dew drops on a spider web – the refraction of light can create amazing effects.
- Capture the fine details of leaves, like veins or water droplets.
- Try food photography: A strawberry or a piece of chocolate can look completely different in macro.
Post-Production Techniques for Macro Photos
Post-processing can take your macro photos to a new level. With software like Lightroom or Photoshop, you can adjust colors, increase contrasts, and remove distracting elements. Depth of field is often a problem with macros, but you can improve it in post-production. Use techniques like focus stacking to combine multiple images with different focus points into one, achieving greater depth of field. In macro photography, depth of field is greatly limited, so it’s important to master these techniques.
Don’t be discouraged if the first attempts aren’t perfect. Macro photography requires patience and practice, but the results are worth it!
Post-Production: The Finishing Touch for Impressive Photos

Post-processing is the secret wand that can transform your photos from good to impressive. Let’s take a look at how it’s done.
Basics of Image Editing
Before you dive into the world of effects, you should master the basics of image editing. Here are a few tips:
- Enhance contrasts: By adjusting contrasts, you can highlight details and make the image appear more vibrant.
- Adjust colors: Play with colors to create the desired mood. A bit of blue for cool elegance or warm orange for coziness.
- Reduce noise: Especially in low-light shots, noise can be distracting. Use tools to minimize it.
The right post-processing can make the difference between a snapshot and a masterpiece.
Create Double and Multiple Exposures
Double and multiple exposures are a great way to achieve creative effects. Even if your camera doesn’t offer this feature, you can simulate it in post-production. Here’s how:
- Stack images: Take multiple shots of the same subject and layer them. This way, you can create interesting overlays.
- Adjust transparency: Play with the transparency of individual layers to achieve the desired effect.
- Use masks: Use masks to make certain areas of the images visible or invisible.
Use Creative Filters and Effects
Filters aren’t just for Instagram! In post-production, you can experiment with various filters and effects:
- Vintage look: Give your photos a nostalgic touch with a retro filter.
- HDR effects: Create dramatic contrasts and intense colors.
- Black and white conversion: Sometimes a monochrome image says more than a thousand colorful words.
With these techniques, you can give your photos the final touch and make them real eye-catchers. So, grab your mouse and have fun editing!
Drawing Self-Portraits: Creativity Without a Camera
Drawing Techniques for Photographers
Self-portraits are a great way to express your creativity without a camera. Drawing is an art form that allows you to express yourself in a whole new way. You can experiment with different techniques, such as hatching or watercolor, to give your portrait depth and expression. A simple pencil can be just as powerful as an expensive graphics tablet. Let your imagination run wild and try different styles.
Storyboarding for Photo Projects
Before you start drawing, it can be helpful to create a storyboard. This helps you structure your ideas and have a clear plan for your project. A storyboard is like a visual roadmap for your photo projects. Roughly sketch how you want to design your self-portrait and note important details like light sources or poses. This way, you have a clear idea of what your finished work should look like.
Inspiration from Art History
Art history offers a wealth of inspiration for your self-portrait. From the classic self-portraits of the old masters to modern interpretations, there are countless examples that can serve as a template. Look at the works of artists like Frida Kahlo or Vincent van Gogh and be inspired by their techniques and styles. Sometimes a little glimpse into the past can fuel your creativity in the present.
Self-portraits are not only an expression of your artistic skills but also a window into your soul. They show who you are and how you see the world. Use this opportunity to rediscover and present yourself.
Creative Studio Photography with Self-Timers and Remote Triggers
High-Speed Photography in the Studio
High-speed photography in the studio is truly fascinating. Imagine capturing the moment a balloon bursts or a fruit is sliced. With the right lighting and equipment, you can freeze movements that are far too fast for the human eye. What do you need? A high-speed camera and a lot of patience. Try different settings and light sources to get the perfect shot.
Projections and Creative Lens Filters
Projections are a cool way to give your studio setup that certain something. With a projector, you can conjure patterns, textures, or even images onto the background. This gives your photos a unique visual dimension. And then there are the creative lens filters. Whether it’s a soft focus for a dreamy atmosphere or prism filters for crazy light effects – the possibilities are endless.
Light Painting in the Studio
Light painting is like magic with the camera. You take a light source, like a flashlight, and “paint” with it in the air while the camera remains open for a long exposure. The result? Breathtaking light artworks that create a very special mood. Experiment with different colors and movements to create your own masterpiece.
In studio photography, you can let your creativity run wild. Whether with high-speed shots, projections, or light painting – the possibilities are limitless. Just try something new and see where it takes you.
Conclusion
So, that’s it for our tips and tricks for creative self-timer and remote trigger photography. Whether you’re just starting out or already a seasoned pro, there’s always something new to discover. Just try something out, whether it’s a crazy effect or an unusual angle. And remember, there are no fixed rules – your picture, your decision! So grab your camera, go out, and have fun experimenting. Who knows, you might discover the next big photography trend. Have fun snapping!
Frequently Asked Questions
How do I take a good self-portrait with a self-timer?
A good self-portrait is achieved with a stable tripod and the self-timer function of your camera. Position the camera, set the timer, and take the desired pose.
What equipment do I need for long exposures?
For long exposures, you need a stable tripod, a camera with manual settings, and possibly a remote trigger to avoid vibrations.
How can I create creative effects in my photos?
Use smoke bombs, sparklers, or light painting to achieve creative effects. Experiment with different lighting techniques and filters.
What are the basics of macro photography?
Macro photography requires special lenses or macro extension tubes. Pay attention to good lighting and use a tripod to avoid blurring.
How do I improve my photos in post-production?
Use image editing software to adjust colors, create double exposures, or add filters and effects. There are many online tutorials that can help you.
Can I create self-portraits without a camera?
Yes, by drawing or painting self-portraits, you can express your creativity. Use storyboarding to plan your ideas and get inspired by art history.

